What to Expect During a Residential Roof Replacement
Replacing your home’s roof ranks among the most substantial investments you’ll make in property maintenance. Here’s the thing though, understanding the process from start to finish takes much of the anxiety out of the equation. A residential roof replacement typically spans anywhere from several days to a couple of weeks, depending on factors like your roof’s size, weather patterns, material choices, and architectural complexity. The more you know about each phase, the better you can prepare your household and maintain productive conversations with your contractor. This isn’t just about slapping new shingles on your house; it’s a carefully orchestrated process that requires planning, patience, and active participation on your part.
Initial Inspection and Assessment
Your roof replacement journey kicks off with a comprehensive inspection by professional roofing contractors. During this crucial phase, experienced technicians examine every inch of your existing roof, identifying damage, deterioration, and structural issues that might complicate the replacement. They’ll evaluate the number of shingle layers already up there, check decking condition, assess ventilation systems, and look for water damage that could require additional attention. This thorough evaluation forms the backbone of accurate project estimates and helps surface any hidden problems before work begins.
Material Selection and Project Planning
Once the inspection wraps up, you’ll collaborate with your contractor to choose roofing materials that align with your budget, style preferences, and performance expectations. Today’s homeowners have options ranging from traditional asphalt shingles to architectural varieties, metal roofing, tile, slate, or synthetic alternatives, each bringing its own set of advantages in durability, appearance, and cost. Your contractor will present samples, walk through warranty options, and honestly discuss the pros and cons of each material given your climate and home design. This planning stage also involves selecting colors that enhance your home’s curb appeal, fit neighborhood aesthetics, and potentially boost property value.
Preparation and Protection Measures
Before any actual roof work begins, contractors implement extensive measures to protect your property and streamline the workflow. The roofing crew typically shows up with dumpsters or trailers positioned strategically to catch debris while minimizing damage to your lawn. They’ll place protective tarps and plywood sheets around your home’s perimeter to shield landscaping, windows, AC units, and other vulnerable features from falling materials. Inside your house, brace yourself for significant noise and vibrations throughout the work process, tear-off and nail gun operations can literally shake walls and rattle items on shelves.
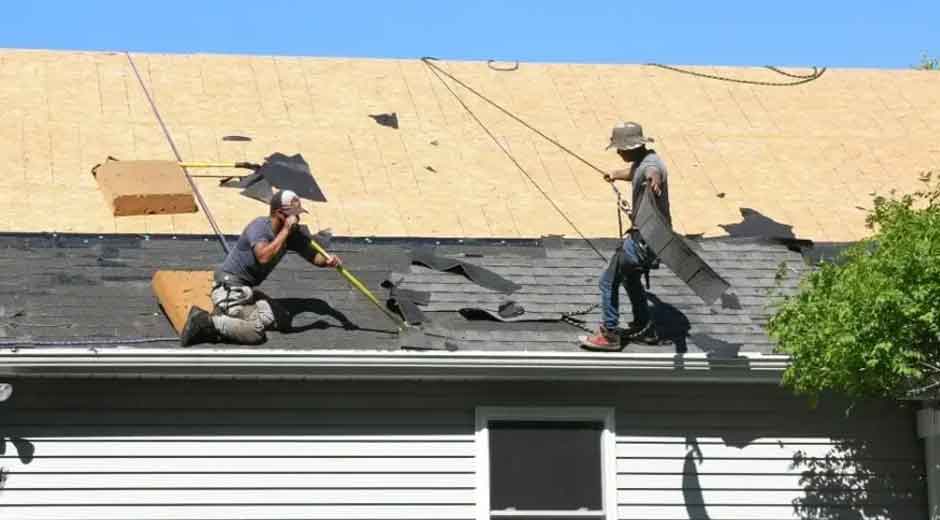
The Tear-Off and Installation Process
The physical transformation begins with removing existing roofing materials, a stage called tear-off that creates considerable noise, debris, and dust throughout your property. Professional crews systematically strip away old shingles, underlayment, and flashing while inspecting exposed decking for rot, water damage, or structural weaknesses needing repair. Any compromised decking gets removed and replaced with fresh plywood or oriented strand board, establishing a solid foundation for your new roofing system. After deck repairs, contractors install ice and water shield in vulnerable spots like eaves, valleys, and around penetrations such as chimneys and skylights for extra waterproofing protection. Next comes weather-resistant underlayment across the entire roof surface, creating a secondary moisture barrier before shingle installation starts. When significant structural damage surfaces during tear-off, homeowners who need to address comprehensive deterioration beyond standard repairs may consider a roof replacement to ensure long, term structural integrity and protection. The crew works methodically from bottom to top, installing starter strips, field shingles, ridge cap pieces, and all necessary flashing according to manufacturer specs and local building codes. Quality contractors keep work sites tidy throughout, conducting daily debris removal and magnetic sweeps to collect stray nails that could puncture tires or injure family members and pets.
Post-Installation Inspection and Cleanup
After completing the shingle installation, professional contractors perform thorough quality inspections to verify proper techniques, adequate ventilation, correct flashing placement, and overall workmanship standards. This final walkthrough ensures all components are securely fastened, properly aligned, and sealed against water intrusion that could undermine your new roof’s performance and longevity. The contractor checks for missed nails, loose shingles, or installation errors requiring immediate correction before signing off on the project. Following quality inspection, the crew launches comprehensive cleanup procedures extending well beyond just hauling away obvious debris.
Conclusion
A residential roof replacement demands careful coordination between homeowners and contractors across multiple distinct phases. Understanding what happens during inspection, material selection, preparation, installation, and cleanup helps you prepare your home and family for temporary disruption while keeping expectations grounded in reality. Clear communication with your roofing contractor, proper property preparation, and active involvement in decisions contribute significantly to project success and your ultimate satisfaction. When you know what’s coming, you can confidently navigate your roof replacement project, ensuring your home receives quality protection that’ll last decades while keeping stress manageable throughout the entire process.